

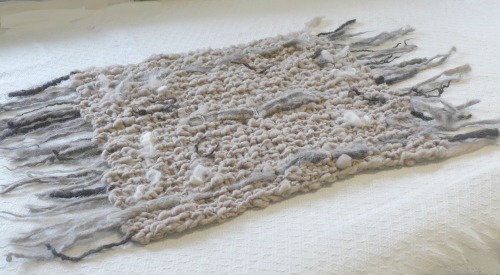
~~~~AFTER~~~~
OK, You just found a wonderful deal on raw wool and you have visions of beautiful wool. When you get it in the mail, you open the box and your hearts sinks. Instead of your beautiful wool, you have a grungy mess of gray, brown or tan wads that look like they may be wool? And what is that smell? NO WORRIES! I’ll tell you how to wash it!
People often ask me what is the best way to wash wool. There are many different methods used and after experimenting with lots of them, I’ll tell you what works for me. The above wool is the dirtiest wool that I’ve ever washed. I had to wash it THREE times to get it clean. It is very tricky washing wool because you have to use hot water and as we all know…what happens when your favorite wool sweater gets in hot water??? it SHRINKS..or felts!!! Yes the wool will felt as you wash it unless you are very, very careful!! If this does happen..believe me…it does! DON”T THROW IT AWAY! This wool is perfect for making cores. It is already felted some so you have some of the work done for you already.
HOW DO YOU TELL IF YOU FELTED YOUR WOOL?
If you cannot separate it. The fibers will have interlocked together, and you have to pull REALLY HARD and it doesn’t come apart, or only comes apart a little.
HOW TO PREVENT FELTING?
Never, never, never not even for a few seconds!!! ever AGITATE the wool!! I know, it is very hard not to agitate the wool, especially when it is as dirty as this wool. You just wanted to scrub it and get it clean! RESIST THAT URGE!
HOW TO WASH
Put some soap in the sink..I use the kitchen..and fill it halfway with hot water. put about 4 ounces of wool in the soapy water.Push it under with a tool so you don’t get burned. Yes it does have to be as hot as possible. I use a thick dowel to push it under the water. Set a timer for 30 minutes. Every 10 minutes or so, push the wool back down in the water. DO NOT SWISH AROUND! The wool will float, so you do have to push it down. DO NOT LEAVE IT ANY LONGER THAN 30 MINUTES! Wool has lanolin on it and the hot water melts it off. If you leave the wool in the water too long, the water cools off and the lanolin redeposits on the wool, and you have to start all over again!!
HOW TO RINSE
Buzzzz. Times up! NOW WHAT!!! BE CAREFUL!! Let the water out of the sink. Rinse the dirt away from the wool and from under it. Fill the sink back up with hot water. The temperature of the water has to be the same as the wash water , or it will “shock” the wool, and this can felt it also!!!! DO NOT LET THE WATER RUN DIRECTLY ON THE WOOL!! This can also felt it. OK, now how dirty is the rinse water? If it is really dirty, I wash it again. I drain the rinse water first and repeat the first step. Time it again for 30 minutes. Rinse and if the water is only a little dirty, rinse it once more.
SPIN OUT
I love to spin out my wool as it takes so much water out, it then dries very quickly, especially if in the sunshine! I use a mesh bag used for washing hosiery or lingerie. ( I HAVE ONE JUST FOR WOOL! LOL!!) Put your washer on the spin cycle, and spin away. DO NOT WRING OUT OR HANDLE TOO MUCH. NEVER AGITATE IN THE WASHER OR IT WILL BECOME ONE BIG FELTED BALL!!
SOAP
I use Unscented TIDE. Some people use dawn, but it is too smelly for me. Since so many people are sensitive to fragrances, I wouldn’t want anyone to return my wool if it was too perfumey. TIDE gets the grease and dirt out without agitation. (I sound like a laundry commercial!) WOOL WASH products aren’t any good for washing raw wool.
DONE!
I know it sounds complicated, but you basically soak your wool , and rinse your wool. Don’t worry if you felt it. I have felted many batches of wool until I learned how GENTLE that you have to be. Pretend that you are washing raw eggs and if you handle it that gently, you’ll do fine!! AND for your labors, you will have beautiful, fluffy sweet smelling wool. I love washing wool. There is such a dramatic BEFORE and AFTER. If you buy colored wool, you don’t know how pretty it is until you wash it. Of course, you can SKIP all this washing and pay more money for clean wool! At least NOW you know how much work goes into washing wool and how carefully it was done.
ALMOST….
OH, by the way! This washing doesn’t get the VM out! VM is vegetable matter such as hay and grass. Of course, by now, it is very clean hay and grass!! This has all got to be picked out after the wool dries. It does fall out when you are working with it. So this is more work that was done to the beautiful clean wool that you buy.
HAPPY WASHING!!!
IF YOU DON’T FEEL THAT YOU WANT TO BOTHER WITH WASHING YOUR WOOL, PLEASE CHECK MY ETSY SHOP WHERE YOU CAN BUY MY SPOTLESSLY CLEAN FRESH SMELLING WOOL THAT IS ALL READY TO USE. ***JUST CLICK ON THE “WOOL AND FIBER” SECTION ON THE LEFT CONTENTS LIST OF MY SHOP. THANKS!
https://www.etsy.com/shop/GourmetFelted?section_id=5642801&ref=shopsection_leftnav_10


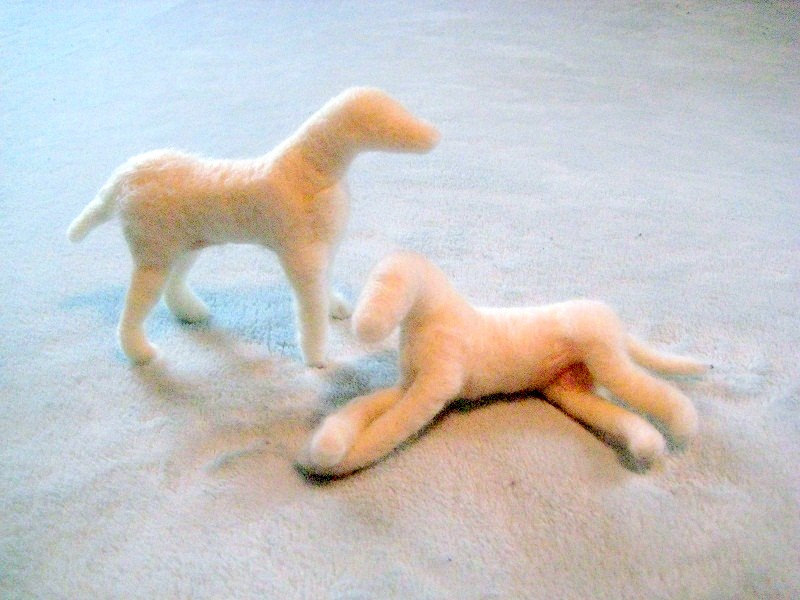


 I frequently get asked if pet hair can be felted? The answer is…it depends on the fur. I felted cat fur for the cat sculpture that I made here. It was the fluffy undercoat so it worked out fine. I still had to blend it with other wool to get the right color. If you have hair that is short and slippery like lab fur, chihuahua fur,and the like, it would be very hard to felt. The fluffy undercoat of dogs is easiest to felt. Such as collies, sheltie, huskies, shepherds,poms , and any breed that is double coated. Poodle hair works as does yorkie fur. Yorkie fur has to be worker a little more. It is sweet to use your pet fur in a pet sculpture as it makes a special keepsake that can become a family heirloom. The best thing to do is experiment and see what you can do!!
  These sweet little bears were felted from pure cat fur made by someone who runs a CAT RESCUE. Now that is recycling!!LOL!!


 Yes I have had my needle felting blog for almost FIVE years!! Wow does time fly!


")


 I finally finished the largest Needle Felted Sculpture that I have ever made. Meet Snowball! She is a beautiful custom Samoyed sculpture that took about a month to make working a little here and there. She is 8 inches tall and 9 inches long! I used Samoyed fur on some of her from the owners pet. It was fun making such a large sculpture as many details can be included! Happy Felting!


Wow! What a bunch of great tips! It was hard to choose the best! I read them all several times! I tried to pick the one tip that could help Everyone felt better. This is a great tip and really helps to get proportions correct on our sculptures. When people send me pics of their dogs for sculptures, I do the same thing and hold the sculpture up near the picture to check everything. Thanks Jessie!! Please let me know what you would like for wool!!
~~~~~~~~~~~~~~~~~~~~~~~~~~~~~~~~~~~~~~~~~~~~~~~~~~~~~~~~~~~~~~~~~~~~~~~~~~~~~~~~~~~~~~~
STAY TUNED FOR BEGINNERS FELTING CONTEST COMING SOON!!
~~~~~~~~~~~~~~~~~~~~~~~~~~~~~~~~~~~~~~~~~~~~~~~~~~~~~~~~~~~~~~~~~~~~~~~~~~~~~~~~~~~~~~~
~HERE IS THE BEST TIP~
My tip is place your animal, creation, anything 3d related to a picture drawn to scale. Draw it in black marker, make sure you are as correct with the shape as possible. This helps when filling out the body, legs, head, facial features. You don’t have to draw the details on the drawing just the correct shape so you can place the felted item onto it to see how you are going.
Share this:
3 Comments
Posted in COMMENT CONTEST WINNER, CONTEST, CONTEST WINNER, felt, felted, FELTING | Tags: felt, felted, needle felted, NEEDLE FELTING CONTEST, WINNER, wool sculpture